The white furnace test

The white furnace test is one of my favourite rendering debug tools. But before it was so, it was rather mysterious and abstract to me. Why would a publication proudly show what seemed like empty renders? What does it mean, and why would they care?

Slide from the presentation Revisiting Physically Based Shading at Imageworks, in which a white furnace test of the diffuse term is shown.
What’s up with the empty grey rectangle? The fact that looks empty is the point.
Revisiting Physically Based Shading at Imageworks, presented at the SIGGRAPH 2017 course: Physically Based Shading in Theory and Practice.

The idea is the following: if you have a 100% reflective object that is lit by a uniform environment, it becomes indistinguishable from the environment. It doesn’t matter if the object is matte or mirror like, or anything in between: it just “disappears”.

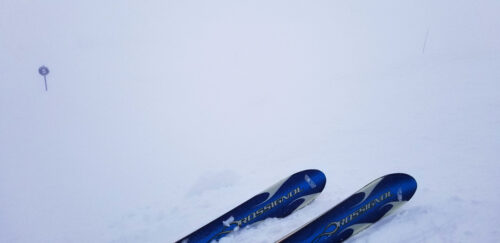
Accepting this idea took me a while, but there is a real-life situation in which you can experience this effect. Fresh snow can have an albedo as high as 90% to 98%, i.e. nearly perfect white. Associated with overcast weather or fog, it can sometimes appear featureless and become completely indistinguishable from the sky, to the point you’re left with skiing by feel because you can’t even tell the slope two steps in front of you. Everything is just a uniform white in all directions: the whiteout.

Photo taken on a ski track. The ground appears almost uniformly white.
Last time I visited a white furnace test. Note how the snow surface slope and details are almost invisible, and the sign in the background seems to be floating in the air.

With the knowledge that a 100% reflective object is supposed to look invisible when uniformly lit, verifying that it does is a good sanity test for a physically based renderer, and the reason why you sometimes see those curious illustrations in publications. It’s showing that the math checks out.

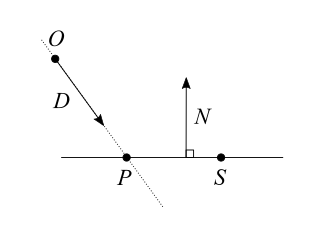
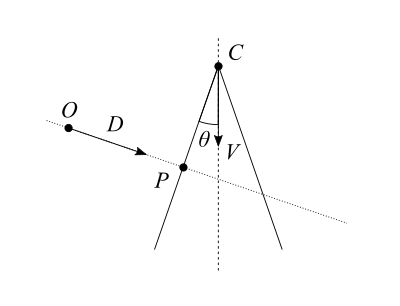
Those tests are usually intended to verify that a BRDF is energy preserving: making sure that it is not losing or adding energy. A typical topic for example is making sure materials don’t look darker as roughness increases and inter-reflections become too significant to be neglected. Missing energy is not the only concern though, and a grey environment (as opposed to a white one) is convenient as any excess of reflected energy will appear brighter than it.

Demonstration of the white furnace test on ShaderToy, or an expensive way to render an empty image. Press the play button to see the scene revealed.

But verifying the energy conservation of a BRDF is just one of the cases where the white furnace test is useful. Since a Lambertian BRDF with an albedo of 100% is perfectly energy preserving and completely trivial to implement, the white furnace test with such a white Lambert material can be used to reveal bugs in the renderer implementation itself.

There are so many aspects of the implementation that can go wrong: the sampling distribution, the proper weighting of the samples, a mistake in the PDF, a pi or a 2 factor forgotten somewhere… Those errors tend to be subtle and can result in a render that still looks reasonable. Nothing looks more like a correct shading than a slightly incorrect one.

So when I’m either writing a path tracer or one of its variants, or generating a pre-convolved environment map, or trying different sampling distributions, my first sanity check is to make sure it passes the white furnace test with a pure white Lambertian BRDF. Once that is done (and as writing the demonstration shader above showed me once again, that can take a few iterations), I can have confidence in my implementation and test the BRDF themselves.

Take away: the white furnace test is a very useful debugging tool to validate both the integration part and the BRDF part of your rendering.

Update: A comment on Hacker News mentioned that it would be useful to see an example of what failing the test looks like. So I’ve added a macro SIMULATE_INCORRECT_INTEGRATION in the shader above, to introduce a “bug”, the kind like forgetting that the integration over an hemisphere amounts to 2Pi or forgetting to take the sampling distribution into account for example. When the “bug” is active, the sphere becomes visible because it doesn’t reflect the correct amount of energy.

A list of path tracing shaders

I have gathered a list of path tracing shaders on ShaderToy.

Path tracing is a surprisingly simple technique to render realistic images. This would be my definition if you are unfamiliar with the term. But if you already have experience with various ray tracing techniques, I would probably say that path tracing is a remarkably elegant solution to the rendering equation. You can implement a toy path tracer in a weekend or, if you’ve already done it a few times before, within 25 minutes.

Recently I was documenting myself on path tracing, and some of the techniques that can be used, like next event estimation, bidirectional path tracing, Russian roulette, etc. This is a case where ShaderToy can be an invaluable source of examples and information, and so I was browsing path tracing shaders there. As the number of open tabs was starting to get impractical, I decided to use the “playlist” feature of ShaderToy to bookmark them all.

You can find the list here: Path tracing, on ShaderToy.

The examples of path tracers listed include very naive implementations, hacky ones, rendering features like advanced BRDF, volumetric lighting or spectral rendering, or various noise reduction techniques such as next event estimation, bidirectional path tracing, multiple importance sampling, accumulation over frames with temporal reprojection, screen space blue noise, or convolutional neural network based denoising.

Some of those shaders are meant to be artworks, but even the technical experimentation ones look nice, because the global illumination inherent to path tracing tends to generate images that are pretty.

Screenshot of the list on ShaderToy, with various kinds of path tracers visible.

Reading list on ReSTIR

Recently a short video from dark magic programmer Tomasz Stachowiak made the rounds in the graphics programming community, at the sound of jaws hitting the floor in its wake. It shows his recent progress on in his renderer pet project: beautiful real-time global illumination with fast convergence and barely any noise, in a static environment with dynamic lighting.

In a Twitter thread where he discussed some details, one keyword in particular caught my attention: ReSTIR.

ReSTIR stands for “Reservoir-based Spatio-Temporal Importance Resampling” and is a sampling technique published at SIGGRAPH 2020 and getting refined since.

The original publication

Spatiotemporal reservoir resampling for real-time ray tracing with dynamic direct lighting
The publication page includes the recording of the SIGGRAPH presentation, with a well articulated explanation of the technique by main author Benedikt Bitterli.
(same publication hosted on the NVidia website).

Explanations of ReSTIR

Improvements over the original publication

After the initial publication, NVidia published a refined version producing images with less noise at a lower cost, which they call “RTXDI” (for RTX Direct Illumination).

Other limitations

When discussing on Twitter some of the limitations of ReSTIR, Chris Wyman made the following remarks:

To be clear, right now, ReSTIR is a box of razor blades without handles (or a box of unlabeled knobs). It’s extremely powerful, but you have to know what you’re doing. It is not intuitive, if your existing perspective is traditional Monte Carlo (or real-time) sampling techniques.

People sometimes think SIGGRAPH paper = solved. Nope. We’ve learned a lot since the first paper, and our direct lighting is a lot more stable with that knowledge. We’re still learning how to do it well on full-length paths.

And there’s a bunch of edge cases, even in direct lighting, that we know how to solve but haven’t had time to write them up, polish, and demo.

We haven’t actually tried to solve the extra noise at disocclusions in (what I think of as) a very principled way. Right now a world-space structure is probably the best way. I’m pretty sure it can be done without a (formal) world-space structure, just “more ReSTIR.”

Intersection of a ray and a plane

I previously showed the derivation of how to determine the intersection of a plane and a cone. At the time I had to solve that equation, so after doing so I decided to publish it for anyone to use. Given the positive feedback, it seems this was useful, so I might as well continue with a few more.

Here is probably the most basic intersection: a ray and a plane. Solving it is straightforward, which I hope can be seen below. Like last time, I am using vector notation.

  1. We define a ray with its origin $O$ and its direction as a unit vector $\hat{D}$.
    Any point $X$ on the ray at a signed distance $t$ from the origin of the ray verifies: $\vec{X} = \vec{O} + t\vec{D}$.
    When $t$ is positive $X$ is in the direction of the ray, and when $t$ is negative $X$ is in the opposite direction.
  2. We define a plane with a point $S$ on that plane and the normal unit vector $\hat{N}$, perpendicular to the plane.
    The distance between any point $X$ and the plane is $d = \lvert (\vec{X} – \vec{S}) \cdot \vec{N} \rvert$. If this equality is not obvious for you, you can think of it as the distance between $X$ and $S$ along the $\vec{N}$ direction. When $d=0$, it means $X$ is on the plane itself.
  3. We define $P$ the intersection or the ray and the plane, and which we are interested in finding.

Since $P$ is both on the ray and on the plane, we can write: $$ \left\{ \begin{array}{l} \vec{P}=\vec{O} + t\vec{D} \\ \lvert (\vec{P} – \vec{S}) \cdot \vec{N} \rvert = 0 \end{array} \right. $$ Because the distance $d$ from the plane is $0$, the absolute value is irrelevant here. We can just write: $$ \left\{ \begin{array}{l} \vec{P}=\vec{O} + t\vec{D} \\
(\vec{P} – \vec{S}) \cdot \vec{N} = 0 \end{array} \right. $$ All we have to do is replace $P$ with $\vec{O} + t\vec{D}$ in the second equation, and reorder the terms to get $t$ on one side.
$$ (\vec{O} + t\vec{D} – \vec{S}) \cdot \vec{N} = 0 $$ $$ \vec{O} \cdot \vec{N} + t\vec{D} \cdot \vec{N} – \vec{S} \cdot \vec{N} = 0 $$ $$ t\vec{D} \cdot \vec{N} = \vec{S} \cdot \vec{N} – \vec{O} \cdot \vec{N} $$ $$ t = \frac{(\vec{S} – \vec{O}) \cdot \vec{N}}{ \vec{D} \cdot \vec{N} } $$

A question to ask ourselves is: what about the division by $0$? Looking at the diagram, we can see that $\vec{D} \cdot \vec{N} = 0$ means the ray is parallel to the plane, and there is no solution unless $O$ is already on the plane. Otherwise, the ray intersects the plane for the value of $t$ written above. That’s it, we’re done.

Note: There are several, equivalent, ways of representing a plane. If your plane is not defined by a point $S$ and a normal vector $\hat{N}$, but rather with a distance to the origin $s$ and a normal vector $\hat{N}$, you can notice that $s = \vec{S} \cdot \vec{N}$ and simplify the result above, which becomes: $$ t = \frac{s – \vec{O} \cdot \vec{N}}{ \vec{D} \cdot \vec{N} } $$


Signed distance to a plane

For the sake of simplicity, in the above we defined the distance to the plane as an absolute value. It is possible however to define it as a signed value: $d = (\vec{X} – \vec{S}) \cdot \vec{N}$. In this case $d>0$ means $X$ is somewhere on the side of the plane pointed by $\vec{N}$, while $d<0$ means $X$ is on the opposite side of the plane.

Distances that can be negative are called signed distances, and they are a foundation of Signed Distance Fields (SDF).

Long hiatus

Last week I was lucky enough to attend SIGGRAPH 2018, in Vancouver. My colleagues and I were presenting on a booth the work we had done, a VR story with a distinctive comic book look. I was also invited to participate to a panel session on demoscene, where I shared some lessons learned while making the 64k intro H – Immersion. The event brought a certain sense of conclusion to this work, aside from filling me with inspiration and motivation to try new things.

It has been a long time since I last posted anything here. For the last two years the majority of my spare time went into making that 64k intro. In fact the last post, “Intersection of a ray and a cone”, was related to it. I was implementing volumetric lighting for the underwater scenes, and wanted to resolve cones of light with ray tracing, before marching inside those cones. LLB and I have talked about the creation process in two making-of articles: “A dive into the making of Immersion”, and “Texturing in a 64kB intro”.

During that time, a lot of new things have happened in the computer graphics community. It has been difficult to keep track of everything. The last topic I started experimenting with is point cloud and mesh capture from photos; I might expend on it here in the future. I also want to experiment with DIY motion capture. Anyway, it’s time to resume posting here.

Intersection of a ray and a cone

Some time ago I needed to solve analytically the intersection of a ray and a cone. I was surprised to see that there are not that many resources available; there are some, but not nearly as many as on the intersection of a ray and a sphere for example. Add to it that they all use their own notation and that I lack math exercise, after a bit of browsing I decided I needed to write a proof by myself to get a good grasp of the result.

So here goes, the solution to the intersection of a ray and a cone, in vector notation.

  1. We define a ray with its origin $O$ and its direction as a unit vector $\hat{D}$.
    Any point $X$ on the ray at a signed distance $t$ from the origin of the ray verifies: $\vec{X} = \vec{O} + t\vec{D}$.
    When $t$ is positive $X$ is in the direction of the ray, and when $t$ is negative $X$ is in the opposite direction.
  2. We define a cone with its tip $C$, its axis as a unit vector $\hat{V}$ in the direction of increasing radius, and $\theta$ the half angle between the axis and the surface.
    Any point $X$ on the cone verifies: $(\vec{X} – \vec{C}) \cdot \vec{V} = \lVert \vec{X} – \vec{C} \rVert \cos\theta$
  3. Finally we define $P$ the intersection or the ray and the cone, and which we are interested in finding.

$P$ verifies both equations, so we can write:

$$
\left\{
\begin{array}{l}
\vec{P}=\vec{O} + t\vec{D} \\
\frac{ \vec{P} – \vec{C} }{\lVert \vec{P} – \vec{C} \rVert} \vec{V} = \cos\theta
\end{array}
\right.
$$

We can multiply the second equation by itself to work with it, then reorder things a bit.

$$
\left\{
\begin{array}{l}
\vec{P}=\vec{O} + t\vec{D} \\
\frac{ ((\vec{P} – \vec{C}) \cdot \vec{V})^2 }{ (\vec{P} – \vec{C}) \cdot (\vec{P} – \vec{C}) } = \cos^2\theta
\end{array}
\right.
$$

$$
\left\{
\begin{array}{l}
\vec{P}=\vec{O} + t\vec{D} \\
((\vec{P} – \vec{C}) \cdot \vec{V})^2 – (\vec{P} – \vec{C}) \cdot (\vec{P} – \vec{C}) \cos^2\theta = 0
\end{array}
\right.
$$

Remember the mouthful earlier about $\hat{V}$ being in the direction of increasing radius? By elevating $\cos\theta$ to square, we’re making negative values of $\cos$ positive: values of $\theta$ beyond 90° become indistinguishable from values below 90°. This has the side effect of turning it into the equation of not one, but two cones sharing the same axis, tip and angle, but in opposite directions. We’ll fix that later.

We replace $\vec{P}$ with $\vec{O} + t\vec{D}$ and work the equation until we get a good old quadratic function that we can solve.

$$
\require{cancel}
((\vec{O} + t\vec{D} – \vec{C})\cdot\vec{V})^2 – (\vec{O} + t\vec{D} – \vec{C}) \cdot (\vec{O} + t\vec{D} – \vec{C}) \cos^2\theta = 0
$$

$$
((t\vec{D} + \vec{CO})\cdot\vec{V})^2 – (t\vec{D} + \vec{CO}) \cdot (t\vec{D} + \vec{CO}) \cos^2\theta = 0
$$

$$
(t\vec{D}\cdot\vec{V} + \vec{CO}\cdot\vec{V})^2 – (t^2\cancel{\vec{D}\cdot\vec{D}} + 2t\vec{D}\cdot\vec{CO} + \vec{CO}\cdot\vec{CO}) \cos^2\theta = 0
$$

$$
(t^2(\vec{D}\cdot\vec{V})^2 + 2t(\vec{D}\cdot\vec{V})(\vec{CO}\cdot\vec{V}) + (\vec{CO}\cdot\vec{V})^2) – (t^2 + 2t\vec{D}\cdot\vec{CO} + \vec{CO}\cdot\vec{CO}) \cos^2\theta = 0
$$

$$
t^2(\vec{D}\cdot\vec{V})^2
+ 2t(\vec{D}\cdot\vec{V})(\vec{CO}\cdot\vec{V})
+ (\vec{CO}\cdot\vec{V})^2
– t^2\cos^2\theta
– 2t\vec{D}\cdot\vec{CO}\cos^2\theta
– \vec{CO}\cdot\vec{CO}\cos^2\theta
= 0
$$

Reorder a bit:

$$
t^2((\vec{D}\cdot\vec{V})^2 – \cos^2\theta)
+ 2t((\vec{D}\cdot\vec{V})(\vec{CO}\cdot\vec{V}) – \vec{D}\cdot\vec{CO}\cos^2\theta)
+ (\vec{CO}\cdot\vec{V})^2 – \vec{CO}\cdot\vec{CO}\cos^2\theta
= 0
$$

There we go, we have our $at^2 + bt + c = 0$ equation, with:

$$
\left\{
\begin{array}{l}
a = (\vec{D}\cdot\vec{V})^2 – \cos^2\theta \\
b = 2\Big((\vec{D}\cdot\vec{V})(\vec{CO}\cdot\vec{V}) – \vec{D}\cdot\vec{CO}\cos^2\theta\Big) \\
c = (\vec{CO}\cdot\vec{V})^2 – \vec{CO}\cdot\vec{CO}\cos^2\theta
\end{array}
\right.
$$

From there, you know the drill: calculate the determinant $\Delta = b^2 – 4ac$ then depending on its value:

  • If $\Delta < 0$, the ray is not intersecting the cone.
  • If $\Delta = 0$, the ray is intersecting the cone once at $t = \frac{-b}{2a}$.
  • If $\Delta > 0$, the ray is intersecting the cone twice, at $t_1 = \frac{-b – \sqrt{\Delta}}{2a}$ and $t_2 = \frac{-b + \sqrt{\Delta}}{2a}$.

But wait! We don’t have one cone but two, so we have to reject solutions that intersect with the shadow cone. $P$ must still verify $\frac{ \vec{P} – \vec{C} }{\lVert \vec{P} – \vec{C} \rVert} \vec{V} = \cos\theta$, or simply, if $\theta < 90°$: $(\vec{P} – \vec{C})\cdot\vec{V} > 0$.

Note that there is also the corner case of the ray tangent to the cone and having an infinity of solutions to consider. I’ve completely swept it under the rug since it doesn’t matter in the context I was, but if it does to you, you’ve been warned about it. Also remember to check the sign of $t$ to know whether $P$ is in the direction of the ray. You may need to determine which of $t_1$ or $t_2$ you want to use, which depends on your use case. For example is your ray origin inside or outside of the cone?


Now for a little sanity test, let’s consider the corner case $C=O$, where the ray origin is the tip of the cone (thanks Rubix for the suggestion!). We have $b=0$ and $c=0$ thus $\Delta=0$ and $t=\frac{-b}{2a}=0$ which is the expected result.

I also tried the cases $\theta=0$ and $\theta=\pi/2$, but expanding $\Delta$ proved too tedious to proceed to the end. So this is left as an exercise, as they say. :)


Finally, to demonstrate that the result is indeed correct, here is a glorious ray traced cone scene on ShaderToy:

I hope this can prove useful to others too.

Oh, and Happy New Year by the way!

Various links on ray tracing

Here are some links related to ray tracing, and more specifically, path tracing.

Some ray tracing related projects or blogs:

Some major publications:

  • The rendering equation, SIGGRAPH 1986, James T. Kajiya. From the paper:

    We present an integral equation which generalizes a variety of known rendering algorithms.
    […]
    We mention that the idea behind the rendering equation is hardly new.
    […]
    However, the form in which we present this equation is well suited for computer graphics, and we believe that this form has not appeared before.

  • Bi-directional path tracing, Compugraphics 1993, Eric P. Lafortune and Yves D. Willems. From the paper:

    The basic idea is that particles are shot at the same time from a selected light source and from the viewing point, in much the same way. All hit points on respective particle paths are then connected using shadow rays and the appropriate contributions are added to the flux of pixel  in question.

  • Optimally Combining Sampling Techniques for Monte Carlo Rendering, SIGGRAPH 1995, Eric Veach and Leonidas J. Guibas. From the abstract:

    We present a powerful alternative for constructing robust Monte Carlo estimators, by combining samples from several distributions in a way that is provably good.

  • Metropolis Light Transport, SIGGRAPH 1997, Eric Veach and Leonidas J. Guibas. From the abstract:

    To render an image, we generate a sequence of light transport paths by randomly mutating a single current path (e.g. adding a new vertex to the path).

  • Robust Monte Carlo methods for light transport simulation, 1998, Erich Veach PhD thesis (432 pages pdf): it presents bidirectional path tracing, and introduces Metropolis Light Transport and Multiple Importance Sampling. From the abstract:

    Our statistical contributions include a new technique called multiple importance sampling, which can greatly increase the robustness of Monte Carlo integration. It uses more than one sampling technique to evaluate an integral, and then combines these samples in a way that is provably close to optimal. This leads to estimators that have low variance for a broad class of integrands. We also describe a new variance reduction technique called efficiency-optimized Russian roulette.

    […]

    The second algorithm we describe is Metropolis light transport, inspired by the Metropolis sampling method from computational physics. Paths are generated by following a random walk through path space, such that the probability density of visiting each path is proportional to the contribution it makes to the ideal image.

Other:

On a slightly different topic, fxguide had a great series of articles on the state of rendering in the film industry, which I previously mentioned.